Cordova apps have a reputation for being the underdogs of mobile development. They are not always the first choice when you need serious performance, especially for something as demanding as real-time camera work. But the truth is, with the right plugins and a bit of native understanding, you can build a camera experience that feels surprisingly fast. You do not need to rewrite your app in Swift or Kotlin just to add a live filter or an AR overlay. The Apache Cordova ecosystem has matured, and the camera API is now powerful enough for serious real-time image processing.
The secret is knowing which plugin to use, how to pipe the camera feed efficiently, and where to apply native code without breaking your JavaScript flow. This guide walks you through that process, step by step, with practical examples and hard-won lessons.
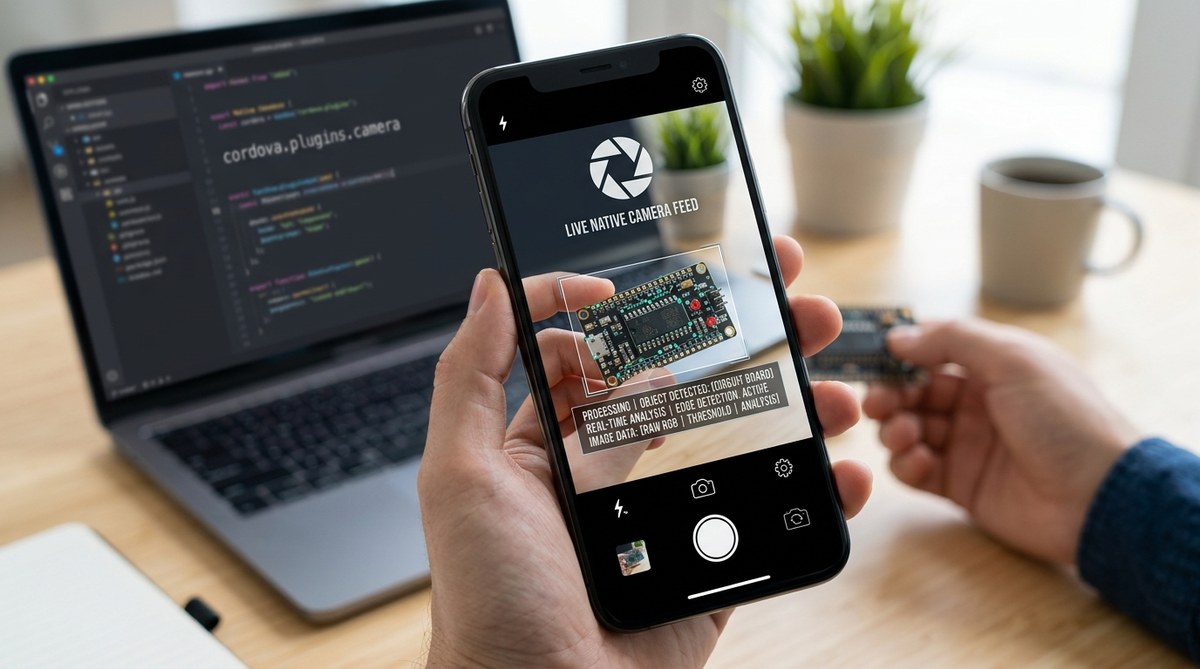
Real-time image processing in Cordova means using the camera preview stream, not just snapping a photo. The right plugin, like cordova-plugin-camera-preview, gives you a live feed you can process frame by frame. You need to manage memory, use WebGL or canvas wisely, and test on real devices for best results.
Why Real Time Matters for Cordova Camera Apps
Users expect more than a static shutter button. They want live filters, barcode scanning, and augmented reality overlays that respond as they move the phone. The native camera API in Cordova opens the door to that experience, but only if you approach it correctly. The default camera plugin captures a single image and hands it back. For real time processing, you need a different path.
The core challenge is simple. Cordova runs JavaScript in a WebView. Native camera hardware speaks Java or Objective-C. To bridge the gap, you need plugins that expose camera frames fast enough for real time work. The good news? You have solid options in 2026.
Why Real Time Matters
Real time image processing changes the user experience. Instead of taking a photo and waiting for a filter, the user sees effects live on screen. That matters for augmented reality, barcode scanning, document scanning, and live filters. The difference between a static capture and a live feed is the difference between a tool and an experience.
When you use Cordova camera API real time image processing, you are not just taking a picture. You are streaming frames from the camera, processing them on the fly, and rendering the result instantly. This opens the door to interactive features that users expect from modern mobile apps.
The Core Challenge: Cordova and Native Camera Access
Cordova wraps web views around native device features. This is powerful, but it adds a layer between your JavaScript code and the device hardware. The standard Cordova camera plugin captures a still image or opens a gallery picker. It does not stream frames for real time work.
For real time image processing, you need a different approach. You need access to the camera preview itself. That means using plugins that expose native camera streams to JavaScript. The most common solution is the CameraPreview plugin, which gives you a live camera feed inside your Cordova app. You can then draw that feed to a canvas, apply filters, and process frames.
This guide walks through the entire flow. You will learn which plugins to use, how to set them up, how to process frames in real time, and what pitfalls to avoid. By the end, you will have a clear path for building camera based features like barcode scanning, object detection, or live filters in your Cordova app.
Why Real-Time Camera Processing Matters in Cordova
Cordova wraps web technologies inside a native container. That is both a strength and a limitation. On one hand, you can build with HTML, CSS, and JavaScript. On the other hand, native hardware access, especially the camera, needs careful plugin handling.
Real time image processing means frames are processed as they arrive from the camera sensor. You are not taking a single photo and then applying effects. Instead, you are analyzing or transforming a live stream. This matters for augmented reality, barcode scanning, face filters, and document scanning.
Cordova apps have a reputation for being slower than fully native apps. That reputation is not always fair. With the right approach, you can get near native performance for camera tasks. The key is using the correct Cordova camera API and understanding how to pass frames to the native side without turning your WebView into a slideshow.
This guide walks you through the practical side of real time image processing in Cordova. You will learn which plugins matter, how to handle camera frames, and how to avoid the common mistakes that slow down apps. No fluff, no corporate talk. Just clear steps you can use today.
Why Real Time Image Processing in Cordova Feels Hard
Cordova apps run inside a WebView. The camera is a native feature. The bridge between JavaScript and native code adds overhead. When you need real time processing, that overhead can become your biggest enemy.
The good news? Modern devices and plugins have closed much of that gap. With the right approach, you can capture frames, apply filters, run object detection, and even overlay AR content without the UI freezing.
The secret is knowing which APIs to use, how to handle the camera stream, and when to drop down to native code. This guide walks you through all three.
Why Real-Time Camera Processing Feels Tricky in Cordova
Cordova apps are web views with native wrappers. That architecture gives you web technologies like HTML, CSS, and JavaScript, but the camera is a native resource. The bridge between JavaScript and native code adds latency. For real time image processing, every millisecond matters.
The default Cordova Camera plugin captures a full resolution image, saves it to disk, and returns a file URI. That works for still photos. It does not work for live preview, frame by frame analysis, or augmented reality overlays. For those tasks, you need a different approach.
The key is to use the camera preview plugin or a WebView based approach that streams camera frames into a canvas. Once the frames are in a canvas, you can apply filters, detect edges, or run a machine learning model. This is where the real power of Cordova camera API real time image processing comes alive.
Why the Standard Camera Plugin Falls Short
The default Cordova camera plugin handles image capture well. You open it, take a photo, and get a file path. But you never see the live feed. You cannot process each frame. You cannot overlay graphics on the viewfinder.
For real time work, you need continuous access to the camera stream. The standard plugin gives you a single snapshot. The moment you press the shutter, the stream stops. That is a fundamental limitation.
The solution is to use a camera preview plugin. These plugins expose the camera stream to JavaScript. You can then draw each frame onto a canvas element. From there, the processing options are nearly endless.
The Core Tools for Real Time Processing
Before you start coding, you need the right tools. Here is a list of the essential pieces:
- Camera preview plugin: Gives you access to the live camera stream.
- Canvas API: Lets you draw frames and apply pixel level manipulation.
- requestAnimationFrame: Controls the frame loop for smooth rendering.
- Typed arrays: Allow fast pixel data manipulation for filters and effects.
- WebAssembly or JS libraries: For heavy tasks like object detection or OCR.
The camera preview plugin streams frames to a hidden video element. You then draw that video element onto a canvas. The canvas gives you access to raw pixel data. You can process that data frame by frame.
Setting Up Your Cordova Project
Start with a fresh Cordova project. You can find the full details in our guide to mastering Cordova plugin development. For now, here is the essential setup:
cordova create realtime-app
cd realtime-app
cordova platform add android ios
cordova plugin add cordova-plugin-camera-preview
The camera preview plugin works on both Android and iOS. It exposes a JavaScript API that you can call from your app. The most important methods are startCamera and getCameraPreview.
Once the preview is running, you can hook into the frame stream. The plugin supports a onFrame callback. This callback fires for every frame. That is where you do your processing.
The Frame Processing Loop
Here is the core structure for a real time processing loop:
const videoElement = document.getElementById('camera-preview');
const canvas = document.getElementById('processing-canvas');
const ctx = canvas.getContext('2d');

function processFrame() {
    ctx.drawImage(videoElement, 0, 0, canvas.width, canvas.height);
    const imageData = ctx.getImageData(0, 0, canvas.width, canvas.height);

    // Apply your filter or effect here
    applyFilter(imageData.data);

    ctx.putImageData(imageData, 0, 0);
    requestAnimationFrame(processFrame);
}

requestAnimationFrame(processFrame);
This loop runs as fast as the device allows. The requestAnimationFrame call ensures you do not block the UI thread. It also throttles the loop to match the screen refresh rate.
The imageData.data property is a Uint8ClampedArray. Each pixel takes up four entries: red, green, blue, and alpha. You can manipulate these values directly for instant visual effects.
Practical Processing Techniques
Here are three practical techniques you can implement right away:
- Grayscale filter: Average the red, green, and blue values for each pixel, then set all three channels to that average.
- Edge detection: Use a Sobel operator to find areas of high contrast in the image.
- Color tracking: Look for pixels that match a target hue range and highlight them.
Each technique works on the raw pixel data. You can combine them for more complex effects. The performance depends on the device and the resolution of the canvas.
Performance Considerations
Real time processing is demanding. Here is a table of common performance trade-offs:
| Technique | Impact on CPU | Impact on battery | Best used for |
|---|---|---|---|
| Full frame filters | High | High | Short demo effects |
| Downscaled processing | Low | Medium | Object detection |
| Region of interest | Low | Low | Barcode scanning |
| Native plugin processing | Very low | Low | Production apps |
The table shows that you can trade accuracy for speed. Downscaling the canvas before processing is a common trick. You lose some detail but gain a massive speed boost.
Expert advice: Always process at the lowest resolution that still gives acceptable results. A 640×480 frame has about 307,000 pixels. A 1920×1080 frame has over 2 million. That is a seven fold difference in work. Downscale first, process second.
Handling Different Device Capabilities
Not all devices are equal. A budget Android phone will struggle with heavy processing. An older iPhone might overheat. You need to handle this in your code.
Start by detecting the device capabilities. Check the available memory and the screen resolution. Use this information to adjust your processing resolution. You can also switch between JavaScript processing and native processing.
For production apps, consider moving the heavy lifting to a native plugin. JavaScript is flexible, but it is not always fast enough. A native implementation can process frames at full speed with minimal overhead.
Scanning and Detection Patterns
Beyond simple filters, you can use the frame stream for detection tasks. Here is a scanning pattern for barcode detection:
// Simplified barcode scanning loop
function scanForBarcode(imageData) {
    const data = imageData.data;
    const width = imageData.width;
    const height = imageData.height;

    // Look for horizontal patterns of dark and light
    for (let y = 0; y < height; y += 4) {
        let transitions = 0;
        let lastBrightness = 0;

        for (let x = 0; x < width; x++) {
            const i = (y * width + x) * 4;
            const brightness = (data[i] + data[i+1] + data[i+2]) / 3;

            if (Math.abs(brightness - lastBrightness) > 20) {
                transitions++;
                lastBrightness = brightness;
            }
        }

        if (transitions > 30) {
            return true; // Likely a barcode
        }
    }

    return false;
}
This is a simplified example. Production barcode scanners use more sophisticated algorithms. But it shows the pattern: analyze the pixel data, look for recognizable patterns, and trigger an action.
Common Mistakes and How to Avoid Them
Here are the most common mistakes developers make:
- Processing at full resolution: Always downscale first.
- Blocking the UI thread: Use Web Workers for heavy processing.
- Not handling device rotation: The canvas orientation must match the camera orientation.
- Forgetting to release the camera: Always stop the preview when the app goes to the background.
- Using the wrong coordinate system: Some plugins flip the image on certain devices.
Avoiding these mistakes will save you hours of debugging. The most important one is the first. Full resolution processing will bring even high end devices to their knees.
Debugging Your Real Time App
Debugging a real time app is tricky. The frame loop runs continuously. You cannot just pause it and inspect the state. You need to use logging and visual debugging aids.
Add a debug overlay that shows the current FPS. Log the average processing time per frame. If the processing time is higher than 16 milliseconds, you are dropping frames. That means the UI will look choppy.
You can also use the browser dev tools with remote debugging. This lets you inspect the canvas and the video element. You can even step through the frame loop, though it will be fast.
For more advanced debugging techniques, check out our guide on advanced debugging for Cordova apps.
Real World Use Cases
Real time camera processing is used in many apps. Here are some examples:
- Augmented reality filters: Snapchat style overlays that track the face.
- Object detection: Identify objects in the camera feed and label them.
- Text recognition: Read text from the camera and translate it live.
- Accessibility features: Help visually impaired users by reading the scene.
- Gaming: Use the camera as a game controller.
Each use case has its own set of requirements. But they all share the same core architecture: camera preview, frame loop, and pixel processing.
Optimizing for Production
When you are ready to ship, you need to optimize. JavaScript processing is great for prototypes. For production, you should consider moving to native code.
You can write a custom Cordova plugin that handles the frame processing natively. This gives you the best performance. The plugin can expose a simple JavaScript API. The heavy lifting happens in native code.
You should also test on a range of devices. The performance difference between devices is huge. What works on a flagship phone might not work on a budget device. Use the device capabilities detection we discussed earlier to adjust your processing.
Performance Budgets and Frame Timing
To maintain smooth video, you need to hit 60 frames per second. That gives you about 16.7 milliseconds per frame. The actual processing has to fit in that budget. If you cannot hit 60 FPS, drop to 30 FPS.
Here is a simple way to measure your performance:
let lastTime = performance.now();
let fps = 0;

function measureFPS() {
    const now = performance.now();
    const delta = now - lastTime;
    lastTime = now;
    fps = 1000 / delta;
    document.getElementById('fps-counter').textContent = fps.toFixed(0);
}
This gives you a live FPS counter. You can use it to test different processing resolutions and see which one gives you a smooth experience.
The Future of Real Time Camera Processing
The web platform is getting better at this. The MediaDevices API and WebCodecs API are becoming more powerful. You can now use hardware acceleration for video processing. This means faster performance and lower battery usage.
For Cordova apps, these APIs are available in the WebView. You can access them through the standard browser APIs. The camera preview plugin handles the native side. The JavaScript side can use the latest web APIs.
You can also use WebAssembly to run compiled C or Rust code in the browser. This is great for heavy processing tasks. Libraries like OpenCV.js can process frames at near native speed.
Final Thoughts
Cordova camera API real time image processing is a deep topic. It touches on camera hardware, JavaScript performance, and pixel manipulation. But the core concepts are simple: get the camera stream, draw it to a canvas, and process the pixels.
Start with a simple filter. Get that working. Then gradually add more complexity. The architecture is the same whether you are applying a grayscale filter or running a machine learning model.
For more optimization tips, see our performance guide for Cordova apps. The frame loop pattern is the foundation. Once you understand it, you can build almost anything.
The most important thing is to start small. Get the camera preview working. Draw a single frame to the canvas. Apply one filter. Then iterate. Before you know it, you will have a full featured real time camera app.